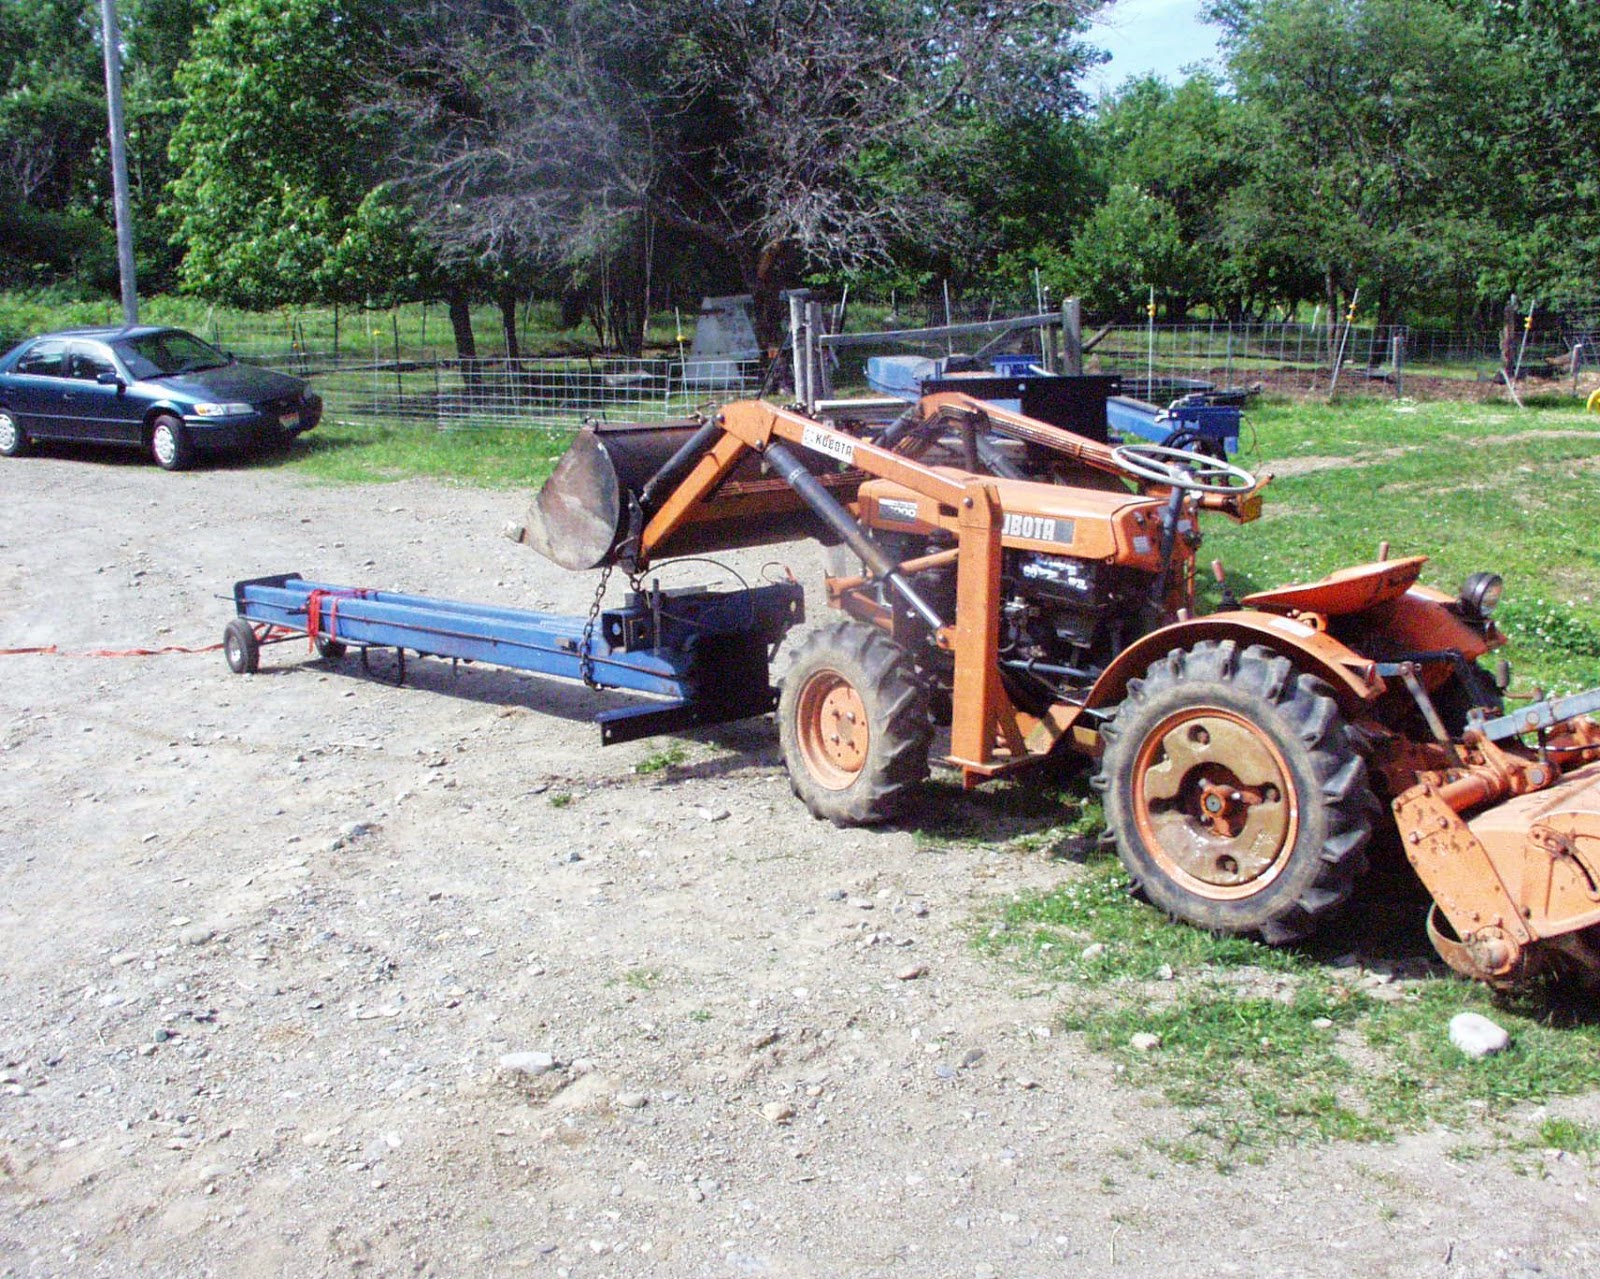
How do you move a four-hundred pound automotive lift with a tiny, forty-one year-old twelve-horsepower Kubota tractor?
The answer I came up with was to attach the hand truck or "dolly" to the light end of each post, and then trundle them in low range, reverse gear very, very slowly to the concrete pad. That worked well.
Before I did this I used phosphoric acid to convert the rust on the underside of each post, and then painted POR-15 rust-proofing on there.
I had placed one post on sawhorses to do this job, the other on blocks on the ground. I like to have things at waist height when I work on them because I have arthritic knees, the result of an old occupational injury from my RAFMRS days. Saves bending or kneeling, both of which are unpleasant for me sometimes.
But it turned out that blocks were the better solution in this case...

...for here is what happened when I went to lower the second post from the sawhorses to the ground.
The chain is too snug and the post has torqued on the tractor's loader, tilting the left rear wheel off the ground.
I called Aimee so she could take a picture for her proposed twelve-month calendar of husbandly tractor disasters, but on inspection she said this wasn't disastrous enough!
I had hoped that the posts could be tilted close enough to their final position with the bucket loader, then manhandled into place, and indeed this procedure might have worked for me had I even one strong helper, but in the end the loader could only get a post to about 60 degrees from horizontal, and at that angle there was still too much weight in the post for me to lift, and no failsafe if something went wrong. Instead I used the floor jack, cribwork, a series of wooden props and bipods, guy lines for fail-safes and the Land Rover winch for the last few feet. Bit-by-bit, I was able to slowly work each post to within a couple feet of vertical, all under control, all without too much exertion. At that point there was only a few pounds of push needed to tilt the column the final distance onto the grout pad.
I meant to take pictures of this operation, but I was so absorbed in solving the problem, and the weather was so hot and humid, I never took the time out. I wanted to be done with the heavy work.
I had hired a rental hammer drill for the anchor bolts. The drill made short work of the holes. I added a layer of hard polyurethane construction cement under the posts, for a final grout, and as a seal to keep out water, to prevent freeze-thaw action. Later today, if the rain holds off, I'll put a skim coat of sand-topping mortar for a final screed over the grout pads, extending this to the edges of the concrete pad, looking to make a slight tilt so the pad sheds water into the new extension's perimeter drainage gully. Before it sets completely, I'll brush the screed with a hard broom for a non-slip surface.
I'll also use the tractor loader to fill in the front of the pad with gravel to make an access ramp so that cars that have relatively low ground clearance, like the Camry or Matrix, don't get damaged just driving into the new work bay.
But that's all today's job. Yesterday, before I could take that fairly irrevocable step of screeding the pad, which would cover all the foundation work for the remaining life of the unit, more or less, I needed to finalize the assembly and test to see if the machine would work properly.
I assembled the wire rope and pulley system that keeps both sides level and ensures an even lift, then finalized the electrical supply, running a 20 amp, 230 volt wire from the breaker box to the back door. The final connection uses a 20 amp twist-lock receptacle, meaning that it's easy to disconnect the entire apparatus, another safety feature. I also modified the wiring to make it all waterproof.
I used the Land Rover for the first test, reasoning that if any of our vehicles could survive being dropped off a lift, this one could.
The Rover frame was essentially designed during WWII as the famous Willys Jeep, and later modified. But even a 1971 Series IIa like mine lacks proper lifting pads on the underside, a feature most modern cars have, and the officially-recommended jacking points, the plates that attach the leaf springs to the axles, are not accessible to a four-arm automotive lift. I improvised, finding spots on the frame that seemed like they should work, then lifting only slowly in case something went wrong.
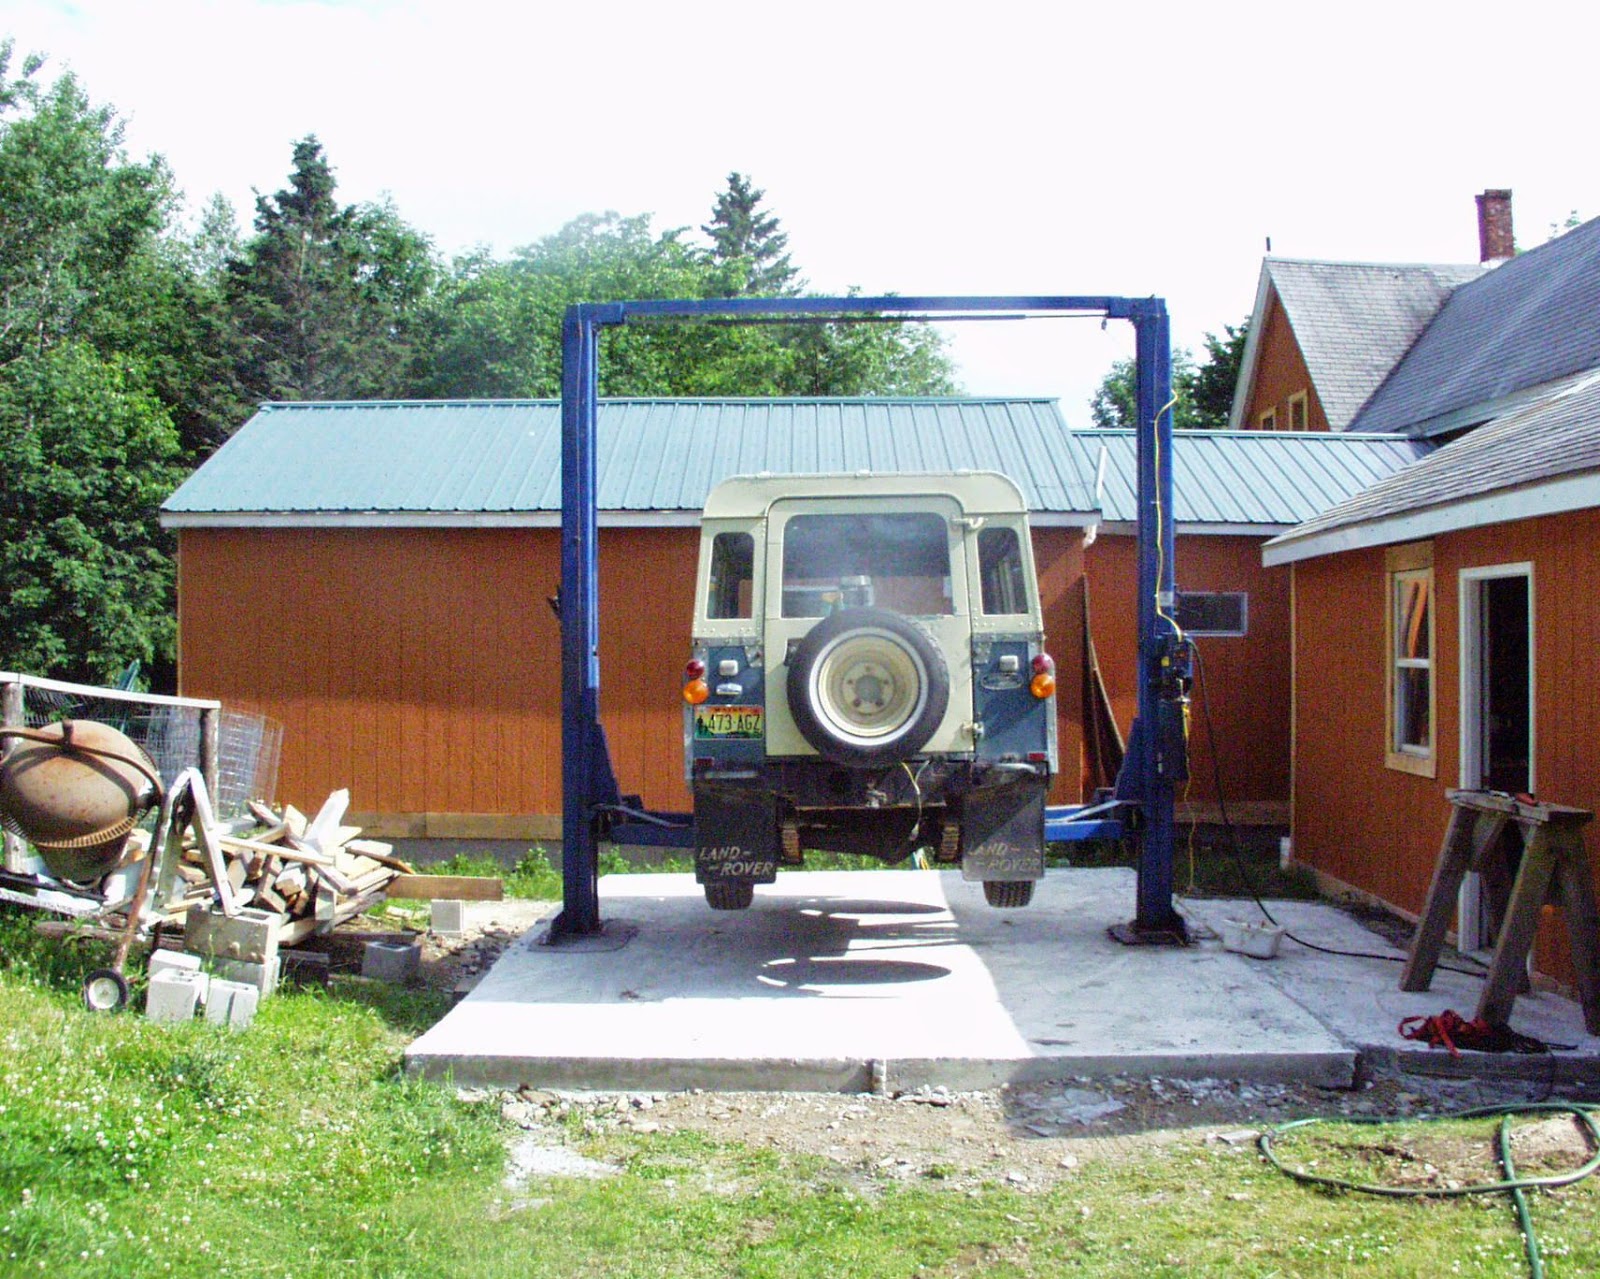
Here is the result of the first lift, with the Rover suitable airborne, and no undesired effects.

To double check the hydraulic system safety, I disabled the ratchet-type safety locking mechanism, then used this length of strapping as a ruler. You can see the pencil mark. I then dis something else for an hour before checking to see if the vehicle had dropped at all. I repeated this experiment three times at different heights, with no movement at all. That means that the hydraulic posts are still in good working condition.
I also double checked the columns for plumb several times with a magnetic "torpedo" level.
Finally I lifted the Rover as high as I was willing to go, given the lack of proper lifting points, which was about five feet off the ground and parked her there for several hours, coming out to check the posts and pencil marks again and again. There was no movement at all.

Here is what we wanted for a final affect -- complete, almost unimpeded access to the underside of the vehicle.
Now that's what I call a Very Nice Picture of my Rover. A work of art, in my book.
Mission accomplished. I'm so glad I decided to get this machine. It will save us all kinds of money, and it will save me a lot of unnecessary danger and arthritis pain.
In other news, the Womerlippis finally bit the bullet on two counts. First we fitted doors to the inside rooms of the old house, in preparation for pre-natal family visiting. We've never bothered with doors, since we don't particularly need any more privacy than we already have here at the end of our road. I took most of the original ones out when I first rebuilt the house. But I doubted very much that this situation would be very comfortable for house guests, and Aimee agreed, and so three new pine doors were fitted, two to the old living room, which will become a nursery and eventually the kid's bedroom, and one to the upstairs bedroom.
We also finally got a new lawn tractor. Our ancient Bolens Model 1669 is in the shop again, awaiting reassembly after a transmission job. Although I want this sturdy beast fixed and back to work, it's likely to remain there for some time because of the length of my honey-do list.
I'm doing fairly well with the list this summer, but still have four vehicles to rust-proof and winterize, two of which require further work to repair and sticker them, as well as a major fencing project, several days of remaining finish carpentry, and a lot of animal and garden husbandry to do.
My new joke is that they call it "finish" carpentry because "...it never gets finished".
Aimee doesn't like this joke very much. Truer words in jest and all that. I hate finish work. It took tow days to do the doors and their associated trim, and I hated every minute of it.
However, not having to repair the Bolens, at least until the fall or winter, is going to save me quite a few days, a welcome change of plans.
The Bolens never mowed that well in any case. Its mower deck is not particularly well-designed, attached with cables rather than rigid metal arms, and on our uneven ground it always tore up the grass badly. Being able to mow our big lawns nicely with the new riding mower now, instead of the push mower, saves considerable time and sweat. I liked the Bolens machine for towing the big yard trailer, and want to return it to that purpose. But I can do that job with the Kubota for now. I just have to be willing to switch out implements more often than I'd like, since you can't tow the yard trailer when the tiller or rock rake are attached.
Of course, it's better if the sheep do the mowing around here, but with all the heat and humidity they're off their feed a little and much prefer to lounge in the shade of the barn. With so much other work still to do, I tend to indulge them. They're apt to break out of their temporary paddocks if they get overheated or if it gets buggy or both, so as to make it back to the barn or to some other shady, relatively bug-free spot. I don't much like chasing sheep in the heat, so they and I agree on this point. Still, the grass was getting shaggy and the weeds were bad in places.
Here's the new machine, an Ariens 17.5 horse, gear-drive model. Nowhere near as sturdy as the Bolens, but economical, made in the USA, and fairly well-made to boot.

And here's the honey-do list again, so readers can evaluate my progress so far.
As you can see, items 1), 13) and 14) are of course more or less endless, but I've checked off 4), 5), 8) 10), 16) and 17). Item 3) was handled partially by the purchase of the new mower. The lift project was of course partially preparatory to # 2, which is my next priority, the sticker having actually expired on the Camry and coming due this month for the Rover.
1) Help wife keep up with doctor's visits and other preventative health measures
2) Maintain and prepare four vehicles for Maine's winter, emphasis on safety, including rust prevention for all four, two safety stickers, one timing chain, one (more) brake job and servicings and oil changes
3) Maintain aging stock of tools and equipment to achieve what follows with less hand labor. Includes
- transmission job on Bolens tractor
- new engine for wheeled weed whacker
- annual service for 41 year old Kubota
4) Extend septic tank drain field by 300 square feet
5) Put siding on the extension and the back of the main house and paint said siding. The extension currently has none
6)Build 300 square foot deck, with safety fence suitable for toddler, and various bells and whistles. Aimee is particularly looking forward to this, and planning out the bells and whistles for me
7) Build new better-looking sheep fence around the deck
8) Put up two-three cords of firewood
9) Keep sixteen sheep, including six lambs, healthy and strong
10) Put up at least three hundred bales of good hay and enough oats and other feed to last winter
11) Towards end of summer: Cull said sheep by selling live or as meat, get down to five or six for the winter
12) Breed remaining sheep in the fall. Sell or cull ram thereafter
13) Grow garden, harvest, put up usual amounts of healthy, non-pesticide sprayed, no chemical-containing food for wife, baby and me. Shift priorities somewhat to foods suitable for toddlers: Apple sauce, carrots, etc
14) Maintain four and a half acres of woodlot and pasture.
15) Clean out barn for winter, compost bedding, a three-day job made harder by no pigs this year
- Remove weeds weekly, don't let them get established and set seed
- Clear dangerous snags and drops
- Top off firewood pile
- Fight sumac grove for (yet) another year -- the Thirty Years War
16) Tidy up dangerous piles of tools and parts in the shed, make safer for eventual toddler
17) Last of all: get house ready for onslaught of family visitors. That's why we built that spare room
Anyway. Enough pontificating. I can see by my list that I have to get back to work on this Fourth of July holiday.
(But every day is a holiday when you're doing what you want to do, working on your own stuff, on your own house and land.)


No comments:
Post a Comment
Welcome to our Farm Blog.
The purpose of this blog is for Aimee and I to communicate with friends and family, with those of our students, and other folks in general who are interested in homesteading and farming activities.
The earliest posts, at the very end of the blog, tell the story of the Great Farm, our purchase of a fragment of that farm, the renovation of the homestead and its populating with people and animals. Go all the way to the last post in the archive and read backwards from there to get it in chronological order.
After getting tired of spam comments (up to a dozen or more per day), I required commentators to be Google "registered users". You can write me at mwomersley@unity.edu if you have a serious comment or question and are not a registered user.
Spammers -- don't bother writing -- there's no way I will post your spam to my blog. Just go away.